POCKETALK S/S Plus
VOICE TRANSLATOR
User Manual
This manual describes how to use Pocketalk S and S Plus.
However, Pocketalk S is used for the illustrations and screenshots in this document.
Version: 1.3
Date: October 2021
Copyright (C) SOURCENEXT CORPORATION All Rights Reserved.
- Home
- From initial setup to translation
From initial setup to translation
Initial setup is required when you turn on the unit for the first time.
First, turn on the unit and get started translating.
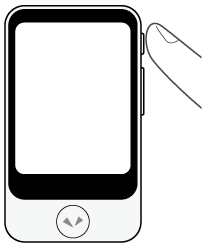
Turn on the unit.
Press and hold the power button on the side of the unit.
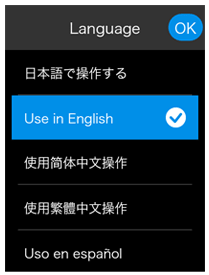
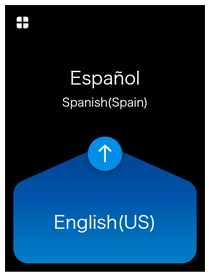
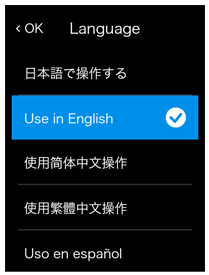
Select the display language.
Select the language that will be displayed on the unit’s screen and tap [OK].
After tapping [OK], global communication will be enabled and is valid for 2 years.NOTE
Explanations are displayed on the screen in the language selected here.
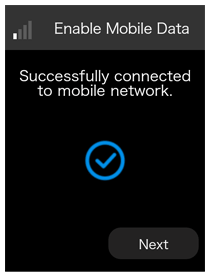
Confirm the mobile network status.
Confirm that the unit is connected and then tap [Next].
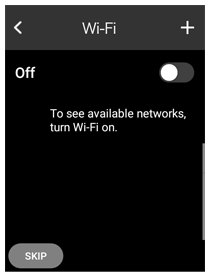
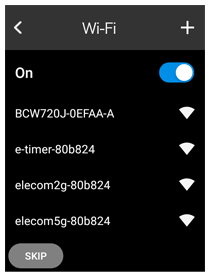
Configure Wi-Fi (optional).
If you do not want to configure it now, tap [SKIP].
To configure it, set [Wi-Fi] to [On], tap the name of the network you want to connect to, and input the password.And you’re done!
When you are finished with the initial setup, refer to “Usage” and try translating!
NOTE
- To translate, the unit must be connected to the internet through a mobile network or Wi-Fi.
- To update the software to the latest version, the unit must be connected through Wi-Fi.
- Home
- Safety precautions
- Home
- Safety precautions
- Before use
Before use
Precautions are categorized as “Warning” or “Caution”. Follow the precautions during use.
| This indicates a description that, if not followed and not properly handled, may result in death or severe injury. | |
| This indicates a description that, if not followed and not properly handled, may result in minor injury. | |
| This indicates a description that, if not followed and not properly handled, may result in product failure, material damage, or loss of data. |
Indication examples
The following symbol indicates that the description requires the user’s attention (including warnings). Indicates cautionary information involving safety.
The following symbol indicates that the description must not be performed. Indicates actions that must not be performed.
The following symbol indicates that the description must be performed. Indicates actions that must be performed.
- Home
- Safety precautions
- Handling
Handling
| Do not operate while walking or driving a car, motorbike, or bicycle. | |
| Never disassemble, repair, or modify the product. | |
Do not apply excessive force.
| |
| Keep the product away from liquids such as water (or drinking water, sweat, seawater, pet urine, etc.). | |
| Do not allow conductive foreign objects (such as pieces of metal or pencil lead) to enter or come into contact with the USB port of the unit or the connector of the included USB cable. Also, do not allow dust to collect inside. | |
| Do not damage the included USB cable. | |
| If there is an abnormality such as odor, noise, smoke, or heat, turn off the product immediately and discontinue use. |
| Do not use, charge, or store in humid, dusty, or extremely hot or cold places. | |
| Do not touch the product for prolonged periods during use or charging. The product may get hot during continuous use or while charging. This is normal. | |
| When using the product, keep the unit (and the hand holding it) at least 5 mm away from your body. |
| Do not press the touchscreen display with excessive force or operate it with pointed objects. |
- Home
- Safety precautions
- Built-in battery
Built-in battery
| Do not leave or store in places of high temperature such as near fire. | |
| Do not prod with sharp objects (such as nails) or strike with hard objects (such as a hammer). | |
| If the built-in battery leaks or emits a strange odor, discontinue use immediately and keep it away from fire. | |
| If the built-in battery leaks, keep it away from clothing or your skin such as your face or hands. Failure to do so may cause damage to your eyes and skin. |
- Home
- Safety precautions
- Electromagnetic interference
Electromagnetic interference
| Use the product properly in aircraft according to the instructions of the airline. | |
| In hospitals and places with electronic devices that require high-precision control and weak signals, use the product properly according to the instructions of the administrator. | |
| If you wear electronic medical devices, or use electronic medical devices other than implantable medical devices for home treatment, confirm the effects of electromagnetic waves with the electronic medical device manufacturer or distributor before use. |
- Home
- Safety precautions
- When charging
When charging
| Use the included USB cable and charge using the specified procedure. Charging with an unspecified procedure may cause battery leakage, heating, or rupture. Also, when charging overseas, use a USB charger that is compatible overseas. |
- Home
- Safety precautions
- When cleaning
When cleaning
| Do not use benzene, thinner, or alcohol. Doing so may deteriorate the exterior or dissolve the parts. If the product is dirty, wipe it with a soft, dry cloth (such as a cloth for glasses). |
- Home
- Safety precautions
- When disposing
When disposing
| Do not throw away the product with normal trash. This product uses lithium-ion battery, and throwing it away with normal trash may cause a fire. Dispose products that are no longer used according to the ordinances or regulations related to waste disposal of your local authority. |
- Home
- Communication functions
Communication functions
If you use the product near other electronic devices, electromagnetic interference may occur. In such a case, change locations or turn off the other devices (stop emission of electromagnetic waves).
- When the product is affected by electromagnetic waves, there may be more noise or communication may be disabled (especially when using microwaves).
- If the product is near a TV or radio, it may interfere with reception or the TV screen may be distorted.
- If multiple wireless LAN access points nearby use the same channel, the product may not be able to search correctly.
- Use this product indoors only when operating in the frequency range of 5150 to 5350 MHz.
- Please note that we are not responsible for data and information leaks that occur during Bluetooth and Wi-Fi communication.
This product complies with the provisions related to Technical Regulations Conformity Certification of Specified Radio Equipment based on the Radio Act, and the provisions related to Technical Regulations Conformity Certification of Terminal Devices based on the Telecommunications Business Act. As proof, you can confirm the “Technical Conformity Mark” with the following operation.
Home screen > Menu > Information > Certification
The Technical Regulations Conformity Certifications will become invalid if the product is modified. Never modify the product, as using it in such a state violates the Radio Act and Telecommunications Business Act.
When using the product overseas, confirm the conditions such as the laws and regulations of the country/region.
- Home
- Confirmation and preparation
Confirmation and preparation
- Home
- Confirmation and preparation
- Confirming the packaged items
Confirming the packaged items
In addition to the unit, confirm that the following items are included.
 | 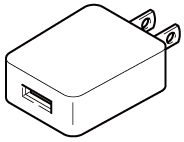 | 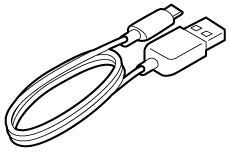 |
| Unit | USB charger (AC 100-240V 50-60Hz) | USB charging cable (Unit connector: USB Type-C Charger connector: USB Type-A) |
- Startup Guide
- User Manual (this document)
- End-user license agreement
- User registration card/Hardware warranty
- Home
- Confirmation and preparation
- Names of the parts
Names of the parts
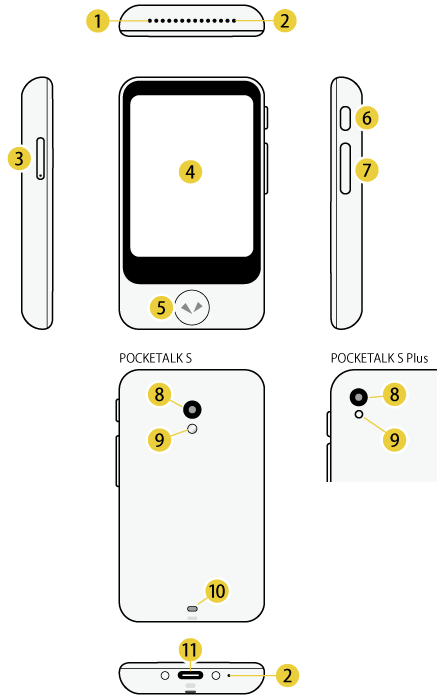
- Speaker
- Microphone
- SIM card slot
- Touch display
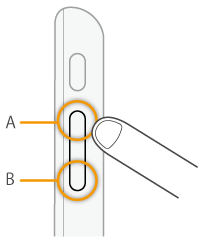
- Talk button
- Power button
- Volume button
- Camera
- Flash
- Strap hole
- USB port
- Home
- Confirmation and preparation
- Charging
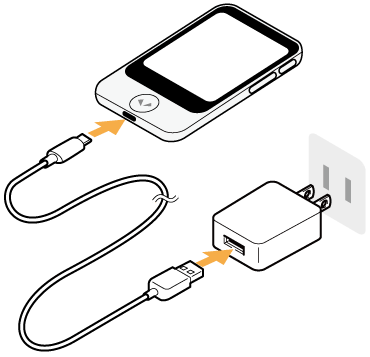
Charging
Charge using the included USB charger and USB cable.
- Home
- Confirmation and preparation
- Turning the unit on or off
Turning the unit on or off
If you press and hold the power button at the side of the unit, the unit and display will turn on.
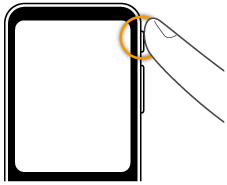
To turn off the unit, press and hold the power button again, and tap [Power off].
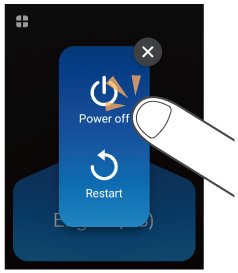
To restart the unit, tap [Restart].
- Home
- Confirmation and preparation
- Operating
Tap
Touching the screen with your fingertip is called a “tap”, which is a commonly used operation. Touching the screen and keeping your finger in place is called “tap and hold”.
Scroll
Swiping repeatedly to view other parts in the screen such as lists is called “scroll”.
Swipe
Dragging your fingertip on the screen in one direction is called a “swipe”.
- Home
- Usage
Usage
- Translating
- Basic screens
- Features available from the Launcher
- Translating text (image translation)
- Using the Convert Units feature
- Using the Role play feature
- Using Favorite translations
- The Medal feature
- Using group chat
- Using Hands-free translation beta
- Useful features for web conferences
- Using the Pocketalk Center
Translating
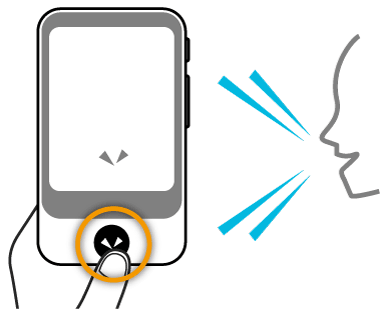
You can translate simply by pressing the button and speaking to the unit.
While pressing and holding
, speak to the unit when you hear a beep sound (release your finger from the button when you are finished speaking).
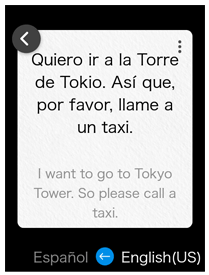
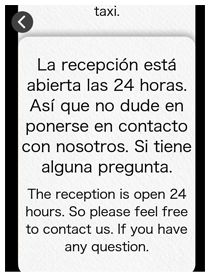
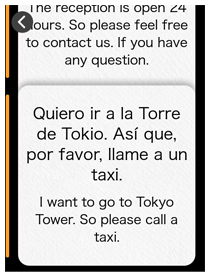
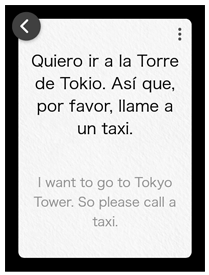
Check the translation result.
Your spoken words and the translation result will be displayed as text, and the translation result will be played back as speech.
Some languages are only displayed as text, without speech playback.
Adjust the volume as needed.
- Tap
- Tap and hold
- Home
- Usage
- Translating
- Changing the translation direction
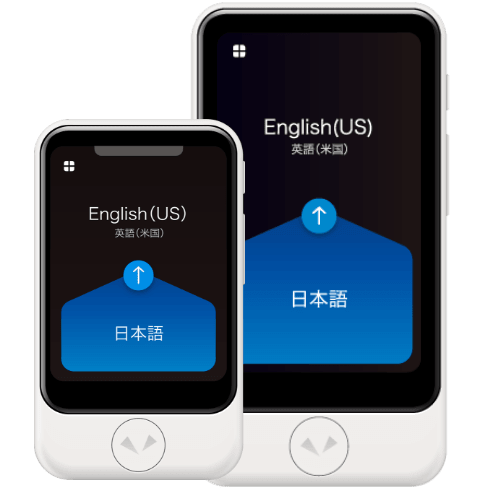
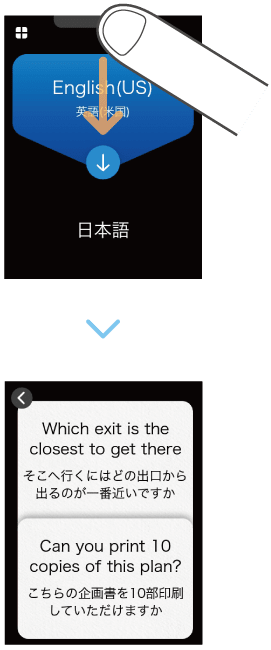
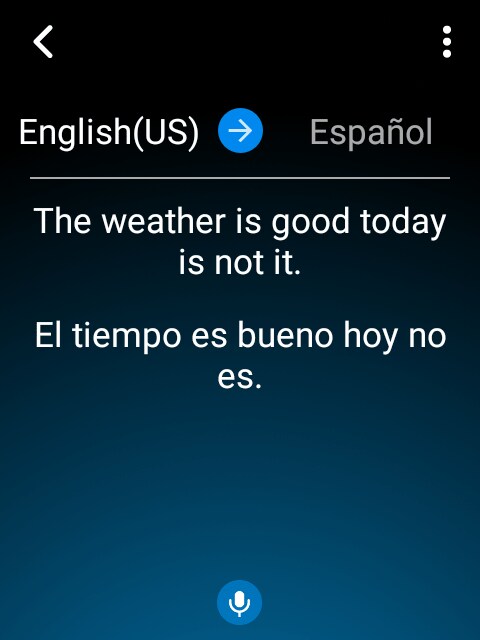
Changing the translation direction
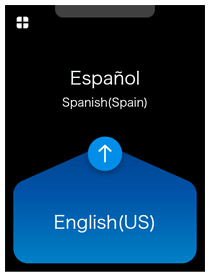
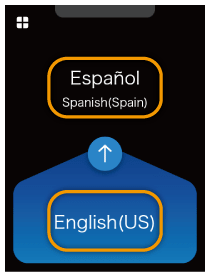
The translation languages are displayed as a pair at the top and bottom of the screen.
The language with the blue background is translated to the language with the black background (in the direction of the arrow).
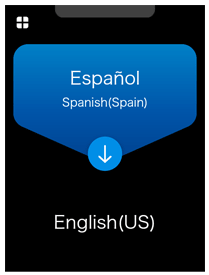
You can change the direction of translation by tapping .
NOTE
The translation direction can be changed manually or automatically. If [Translation direction correction] is [ON], the translation direction will be corrected automatically.
- Home
- Usage
- Translating
- Changing the translation language
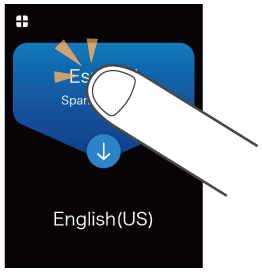
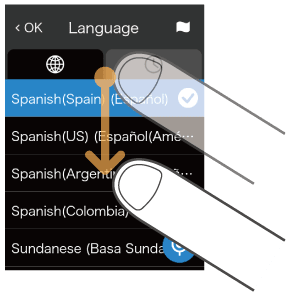
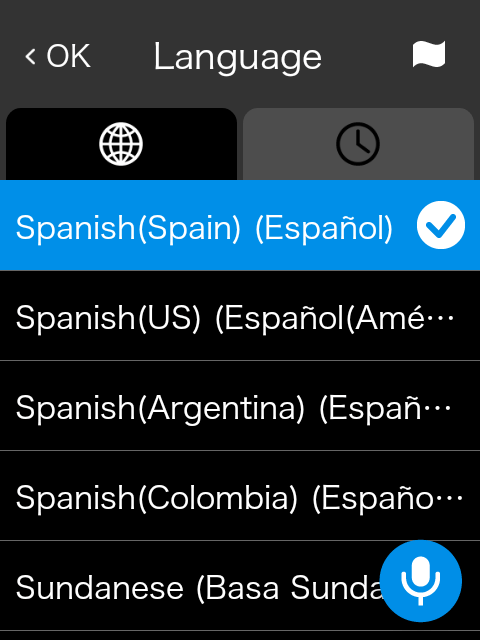
Changing the translation language
If you tap a language you want to change, a list of languages is displayed.
Scroll through the list of languages, select the language you want to use, and tap [OK] at the upper left.
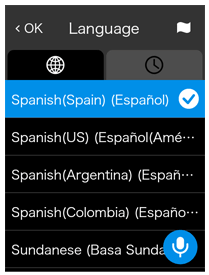
You can easily search for the language you want with the following methods.
| Select from languages you have used previously. | |
| Display a list of countries. Select from the main languages used in a country. | |
| If this icon is displayed on the screen, press |
NOTE
Some languages do not support voice input or voice output of translation results. In such a case, is displayed when a language is selected.
For details, refer to the website “List of supported languages”.
- Home
- Usage
- Translating
- Using the translation history
Using the translation history
You can reuse previous translations.
If you swipe the top part of the screen downward, previous translations will be displayed in a list of callout boxes.
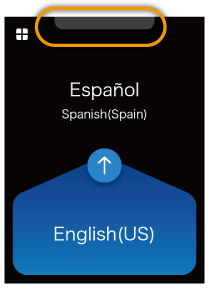
You can view older translations as you scroll upward.
The history saves up to 10,000 translations.
By tapping one of the callouts from the translation history list, you can add the translation result to Favorites or use the option menu to translate into other languages.
- To display the option menu, tap and hold a translation result or tap
- Tap
- Home
- Usage
- Translating
- Using the option menu
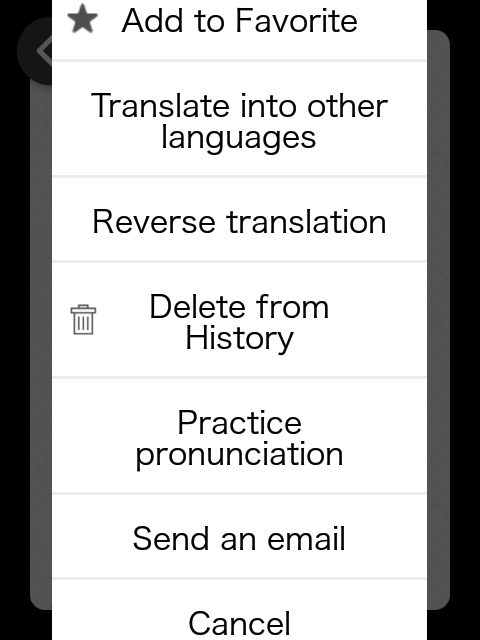
Using the option menu
You can use the following features immediately after translation and when using the option menu in the translation history.
NOTE
The option menu is displayed immediately after translation and tapping on the translation result in the translation history, or by tapping and holding the translation result. It is also displayed by tapping and holding the translation history list.
Add to Favorite
Tap this item to register a translation result as a favorite and quickly display it from [Favorites] in the Launcher.
You can also register by swiping the callout to the right.Using Favorite translations
Translate into other languages
You can translate into a language different from the translated language.
The results of translating into other languages are added to the translation history.
Reverse translation
Translate translated text back into the original language.
The results of translating into the original language are added to the translation history as blue callouts.
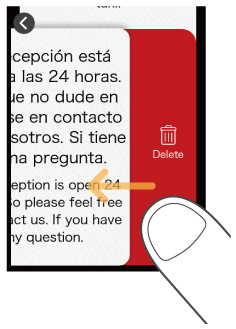
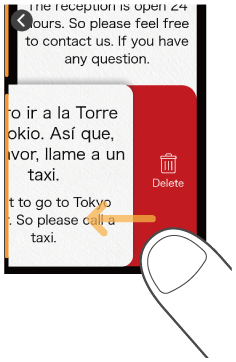
Delete from History
Deletes the selected translation result from the translation history list.
You can also delete by swiping the callout to the left.
NOTE
This feature is not displayed in the option menu immediately after translation. It is available in the option menu in the translation history.
Practice pronunciation
You can practice pronunciation by reading the translated text out loud to the unit.
Send by mail
You can send the translation result by email. To use this feature, you must register for use of the Pocketalk Center.
NOTE
This feature is not displayed in the option menu that is displayed by tapping and holding the translation history list. It is available immediately after translation or in the option menu of the translation result displayed by tapping the callouts from the translation history.
Basic screens
This section describes the Home screen used for translation, the Launcher used for other features, and the lock screen.
Home screen and Launcher
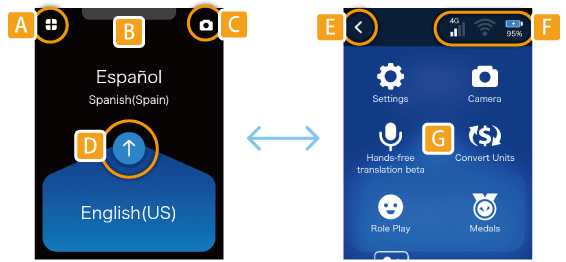
| A | Displays the Launcher. |
| B | Displays the translation history when swiped downward. |
| C | Frequently used features can be placed here. |
| D | Changes the language to be translated (blue background indicates the source language). |
| E | Returns to the Home screen. |
| F | Displays the status of the following from left to right.
|
| G | Provides useful features other than translation. For details, refer to Features available from the Launcher. |
Lock screen
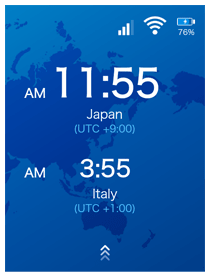
If the lock screen setting is on, the lock screen will be displayed when the unit is not used for a certain period of time.
To unlock the screen, swipe the slider. If the PIN code is [ON], swipe the slider and then enter the PIN code to unlock.
About the lock screen
The upper row displays the current location and time.
The lower row displays the previously visited location and time.
The battery level and communication status are displayed at the upper right of the screen.
For details, refer to “Using the Lock Screen”.
Features available from the Launcher
You can use the following useful features.
 | Camera | Translates captured text. You can easily translate languages you do not understand, such as city signs and restaurant menus. |
 | Convert Units | Converts currency, length, weight, and temperature to local units. |
 | Favorites | Saves frequently used translation results for later use. |
 | Group Translation | Group chat is available between multiple "Pocketalks". |
 | Hands-free translation beta | You can translate without pressing |
 | Medals | Displays medals obtained through continuous use in various situations. |
 | Role play | Uses AI for foreign language conversation practice in many settings such as an airport or hotel. |
 | Settings | Allows configuration of various settings such as network settings, volume, screen brightness, and text size. |
 | Fixed Phrases | Allows addition of the [Fixed Phrases] feature if you use [Settings] - [Pocketalk Center]. |
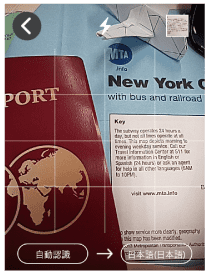
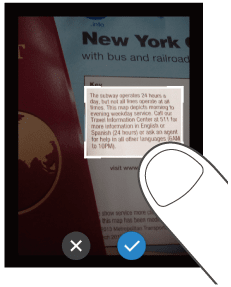
Translating text (image translation)
You can easily translate text such as city signs and restaurant menus.
Tap
Face the camera toward the text you want to translate.
- If your surroundings are dark, tap
To change the target language, tap the language name on the right side.
- To focus, touch the screen where you want to focus with your finger.
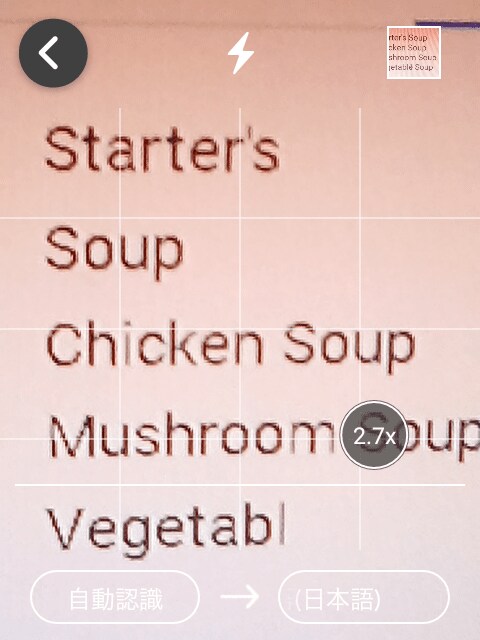
- You can change the zoom ratio by moving the handle at the bottom of the screen to the left or right.
- If your surroundings are dark, tap
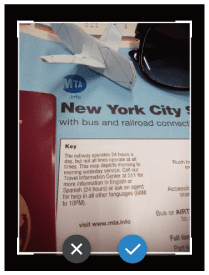
Take a photo of the text.
Press the
- After the photo is taken, a preview is displayed.
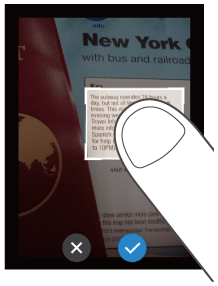
Specify the area to translate.
Touch one of the four corners of the frame with your finger and move it to change the size of the frame.
Touch the center of the frame with your finger to move the translation area.- When you have decided the area to translate, tap
- When you have decided the area to translate, tap
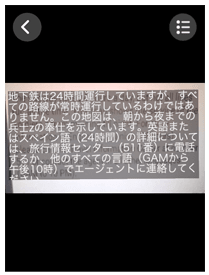
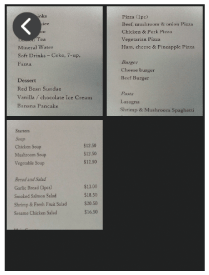
Check the translation result.
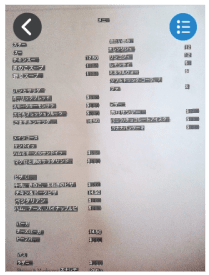
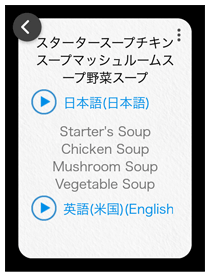
The translation result will be displayed over the image text. If you tap the translation result, the text will be displayed as a pop-up.
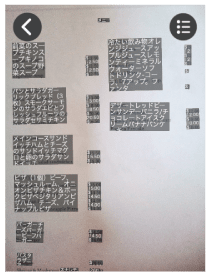
If you tap [Line Mode icon], Line Mode will start.
If you want to translate line by line such as a restaurant menu, tap [Line Mode icon].
Tapping
By tapping- To close the pop-up, tap
- When you are finished translating, tap
- To close the pop-up, tap
NOTE
- For a list of languages supported by camera translation, refer to the following website.
https://rd.snxt.jp/PS864 - This feature is not available if the [Region of use] is set to [China].
- Home
- Usage
- Translating text (image translation)
- Using the image translation history
Using the image translation history
You can reuse previous image translations.
If you tap the thumbnail at the top of the screen, the image translation history will be displayed as a list.
- The image translation history saves up to 100 translations.
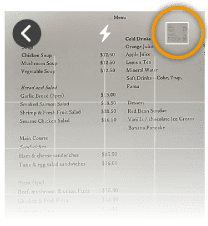
Tap the image you want to reuse to recall the translation data.
By tapping and holding one of the images from the history list, you can open the translation data or use the option menu to send the image by email. To delete the entire history, refer to Using the Reset feature.
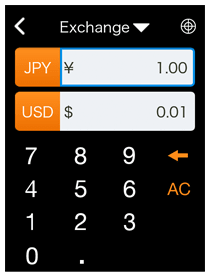
Using the Convert Units feature
You can convert units such as currency and weight. This feature can be useful in occasions such as shopping overseas.
Tap
The [Exchange] screen is displayed.
Select the currency to convert.
Tap the currency selection button and select a currency.
Upper row: Source currency
Lower row: Target currency- If you tap
- If you tap
Input the amount in the input field.
When you input an amount in the upper row, the converted amount is displayed in the lower row.
- The conversion rate is updated once a day when this feature is started.

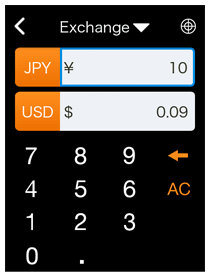
Switching conversion units
If you input an amount in the lower row, the converted amount is displayed in the upper row.
Changing conversion types
Tap [Exchange▼] and select from the following four types.
- Currency
- Length
- Weight
- Temperature
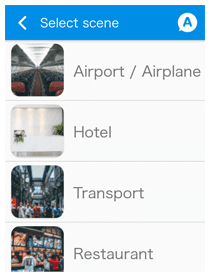
Using the Role play feature
You can practice typical conversations by setting.
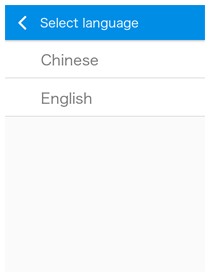
NOTE
Lessons are available only in English (US) and Chinese (Simplified). (As of October 2021)
Tap
Available languages will be displayed.
Common settings are displayed such as the airport or hotel.
If you press the button at the upper right, the language selection screen will be displayed.
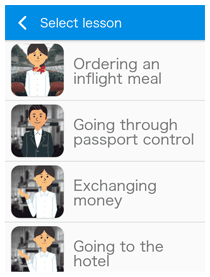
Select a lesson.
Tap a setting and a list of lessons will be displayed.
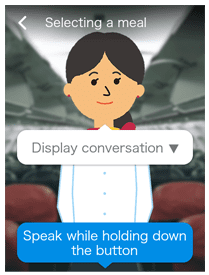
Tap the lesson you want to practice.Practice conversation.
A character will appear and talk to you.
While pressing
When the lesson is finished, tap the button and select another lesson.
Using Favorite translations
You can easily recall the phrases that you added to Favorites from the translation history.
NOTE
When you purchase the unit, [Favorites] is not available in the Launcher at first. It will be displayed when you add phrases displayed in the translation history to Favorites.Add to Favorite
Tap
Favorites added from the translation history are displayed.
Tap the phrase you want to use.
The phrase is played back.
Deleting Favorites
Swipe the phrase to the left to delete it from Favorites.
NOTE
By tapping and holding any one phrase from the Favorites list, you can use the option menu to translate that phrase into other languages or use reverse translation.Using the option menu
The Medal feature
You can earn medals by meeting certain conditions, such as the number of times translated, or the number of countries visited.
Tap
You can earn medals by meeting conditions such as “Translated 10 times” or “Visited 2 countries”.
There are three types of medals based on difficulty: Gold, silver, and bronze.
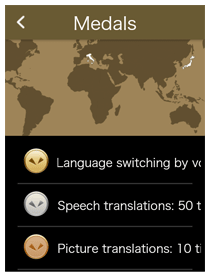
Tap on a medal to check when you earned it.
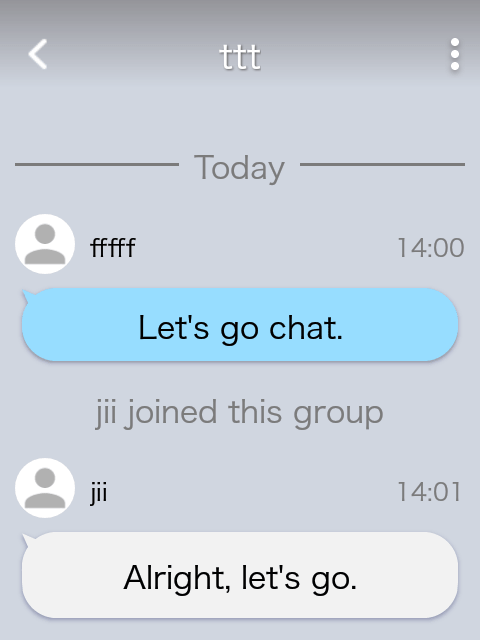
Using group chat
You can use Pocketalk’s Group Translation feature to have a group chat. [Group Translation] is a feature that allows you to have real-time conversations with people in and out of the country between multiple Pocketalk Voice Translators. Simply create a group and speak to "Pocketalk", and the message will be displayed in the native language set by the group members, so you can have a conversation in your own language even if there are speakers with multiple languages in the group.
Creating and joining a chat group (organizer side)
Tap
The person who created the group will be the owner (organizer).
Input the group name and tap [Create].
When the group info (group ID, password, QR code) is displayed, group creation is complete.
Share the displayed group info with other members.
You can show group info and share later without sharing it immediately.
Tap [Join] on the [Group Info] screen to continue.
The [Profile] screen will display on the next screen.
Set the user name and native language.
Messages received from group members will be displayed in the language set here.
You can tapWhen the settings are complete, tap [Save].
The group chat screen will display on the next screen.
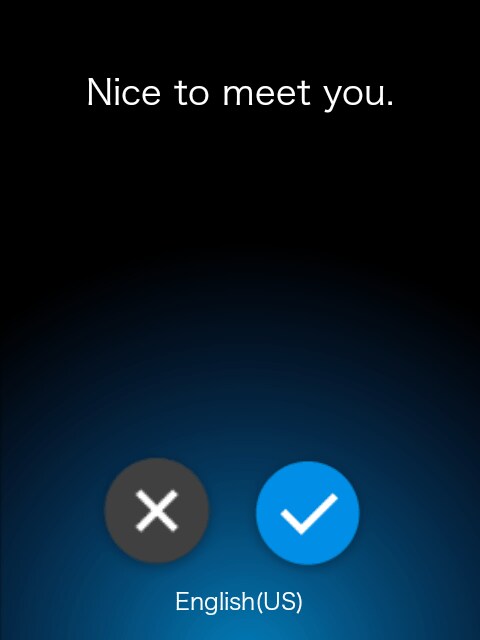
On the group chat screen, press and hold
A confirmation for the speech will display on the screen.
If it was recognized correctly, tap
If you tap*Language set by each member on the [Profile] screen.

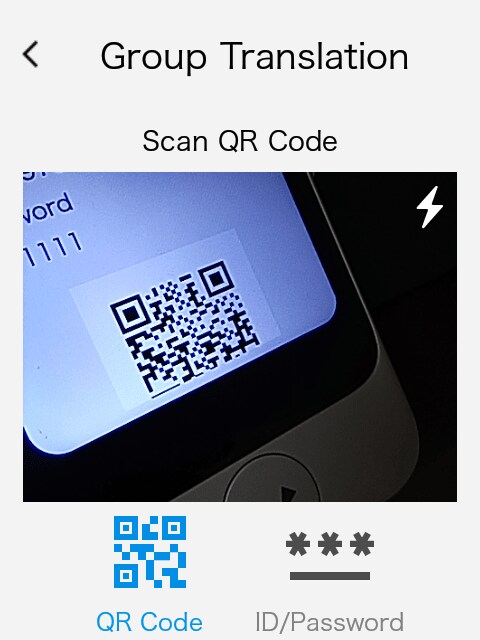
Joining an invited group (member side)
Join using the group ID and password or QR code shared by the group owner (organizer).
Tap
Scan the QR code or tap [ID/Password] and then enter the group ID and password.
Tap [Join].
The [Profile] screen is displayed.
Set the name and language.
Messages received from group members will be displayed in the language set here.
You can tapWhen the settings are complete, tap [Save].
The group chat screen is displayed.
On the group chat screen, press
A confirmation screen for the speech is displayed.
If it was recognized correctly, tap
If you tap*Language set by each member on the [Profile] screen.
NOTE
- Tap
- When you join a group, the group chat screen will be displayed from then on.
- If you are "Using the Notification feature”, you will be notified when you receive a message from a group member. The default setting is [OFF].
Things you can do with the option menu
You can use the following features in the option menu displayed by tapping at the upper right of the group chat screen.
Send a picture
You can take a photo by pressing .
Check the preview screen of the taken photo and tap to send it.
If you tap , the photo will not be sent.
Show messages in the original language
Displays in the language set by other parties (source text).
Show Group information
Displays the group info. You can leave or delete a group.
NOTE
- Only the group owner (organizer) can change the group name or delete the group.
- To create another group or join another group, delete the group you created or leave the group you joined.
- This feature is not available if the [Region of use] is set to [China].
Edit Profile
You can change the icon, user name, and the language used to display messages from group members.
Using Hands-free translation beta
You can talk to the unit without pressing . The translations are displayed on the screen in real time, which is useful when translating meetings or speeches in a foreign language, or when translating and showing your speech in a foreign language.
NOTE
- A Wi-Fi connection is required to use this feature.
- This feature is a β (beta) version. Services may subject to change or termination.
Tap
Tap [Start] and talk to the unit (or listen).
When the transcribed speech reaches a certain amount of characters, the translation result will display on the screen, and new translations will display in ascending order (scroll through the translation results to see previous translation results).
- Tap
- Tap
- Tap
- To change the translation language, refer to "Changing the translation language”.
Things you can do with the option menu
You can use the following features in the option menu by tapping at the upper right of the screen.
View in the browser
In addition to the unit’s screen, translation results can be displayed in real-time from a web browser on a smartphone or computer.
- On the [View in the browser] screen, tap [OFF] to change it to [ON].
Information for using a web browser, such as the URL and QR code, will display on this screen.
NOTE
[View in the browser] is enabled for 3 hours after setting it [ON].
- Visit the URL shown on screen or scan the QR code.
A dedicated site for Hands-free translation beta will appear.
- Input the [Shared number] and [Password] displayed on Pocketalk’s [View in the browser] screen into the appropriate fields on the dedicated site, and click [View] (input is not required for the QR code).
- Talk to the unit (or listen).
Your speech is translated in real-time and the translation will display as characters on the web browser.
Switch display mode
You can switch the placement of speech and translation results to appear next to each other (left/right) or stacked on each other (up/down).
Clear display
Deletes all displayed translation results.
Useful features for web conferences
Using software for Windows "Pocketalk Subtitles" and Pocketalk, you can overlay the speech from yourself and other parties on webcam images like movie subtitles.
"Pocketalk Subtitles" is used with [Screen sharing] in the unit.
For details, refer to the "Pocketalk Subtitles" website and "Manual" to use this feature.
NOTE
If the other party does not have Pocketalk, the conversation between you and the other party is translated in real-time using [Hands-free translation beta] for voice calls such as in web conferencing services, and the translated screen is shared* using [View in the browser] to allow conversation.
*You can also share the translated screen by informing the other party of the information (URL or QR code) displayed on the screen.
Using the Pocketalk Center
By using Sourcenext’s “Pocketalk Center”, you can view the unit’s translation history on a smartphone or computer, and download useful fixed phrases.
Tap
A QR code and URL to access the Pocketalk Center are displayed.
Access using a smartphone or computer, and in the displayed screen, input the authorization number displayed on the unit.
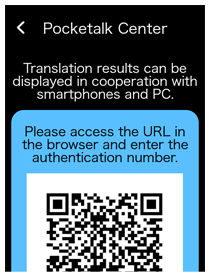
From here, follow the on-screen instructions.
- Home
- Various settings for the unit
Various settings for the unit
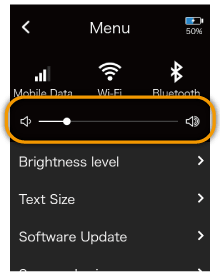
About [Menu]
Allows configuration of various settings such as network settings, volume, screen brightness, and text size.
Tap
A list of various settings for the unit is displayed.
- Scroll the list upward to check all of the features.
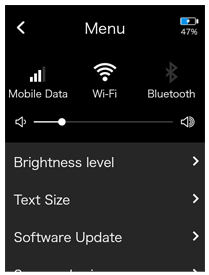
You can configure the following.
- Mobile Data
- Connect the unit to a mobile network.
- Wi-Fi
- Connect the unit to Wi-Fi.
- Bluetooth
- Connect the unit to a Bluetooth device.
- Volume
- Set volumes such as the unit’s system sound.
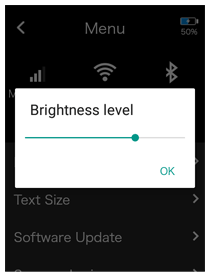
- Brightness level
- Adjust the display brightness with the slider.
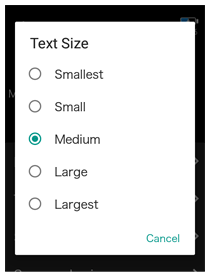
- Text Size
- Select from five types.
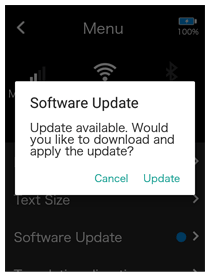
- Software Update
- Keep the unit up-to-date with the latest version.
- Screen sharing
- A useful feature when using a web conferencing service.
- Translation direction correction
- Set whether to automatically switch the direction of the language to be translated.
- Shortcut
- Place frequently used features on the Home screen.
- Lock screen settings
- Lock the screen to prevent unintentional operation.
- Pocketalk Center
- Various features are available by using the Pocketalk Center, such as linking the unit with a smartphone or downloading [Fixed Phrases].
- Notification settings
- Receive notifications such as software updates.
- Sleep Settings
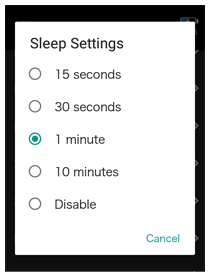
- Select from 15 seconds, 30 seconds, 1 minute, 10 minutes, or Off.
- Language
- Select the display language of the unit.
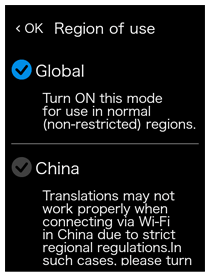
- Region of use
- Set the region where the unit is used.
- Communication Plan
- Confirm the validity of your global communication plan. (Only models with built-in global communications)
- Information
- Check information such as the end-user license agreement.
- Support
- Check the support site from the URL or QR code.
- Reset
- Delete history or Favorites, or restore the unit to factory default settings.
- Home
- Various settings for the unit
- Mobile network settings
Mobile network settings
This section describes how to turn mobile communication on/off and how to switch SIMs.
Tap
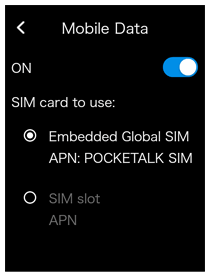
Turning mobile communication on/off
Tap the slide switch to switch between [ON] and [OFF].
Switching SIMs
Tap the [SIM card to use] to select the SIM you want to use.
To use a SIM card from a different carrier, refer to “Inserting a SIM” to insert the SIM card, follow the instructions of the SIM card provider, and set the access point.
NOTE
The unit supports only nano SIM cards.
- Home
- Various settings for the unit
- Connecting to Wi-Fi
Connecting to Wi-Fi
This section describes how to turn Wi-Fi communication on/off and how to set an access point.
Tap
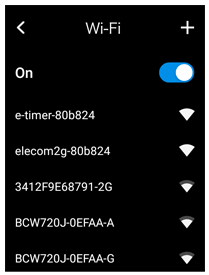
Turning Wi-Fi communication on/off
Tap the slide switch to switch between [ON] and [OFF].
Connecting to an access point
Tap the access point you want to connect to and input the password. For details, contact the administrator of the access point.
Connecting to an access point that is not displayed
Tap [+] at the upper right of the screen and input the following information.
- Network name
- Security
- Passkey
For details, contact the administrator of the access point.
- Home
- Various settings for the unit
- Pairing with a Bluetooth device
Pairing with a Bluetooth device
You can connect Bluetooth devices such as headphones or speakers.
Tap
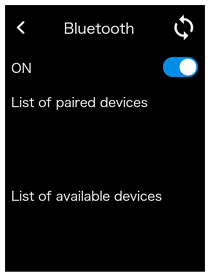
Turning Bluetooth on/off
Tap the slide switch to switch between [ON] and [OFF].
Pairing with a Bluetooth device
If you put the Bluetooth device you want to pair with into pairing mode, it will be displayed in the [List of available devices]. If you tap the displayed device name, it will be paired and displayed in the [List of paired devices]. If it is still not displayed, tap .
Unpairing
Tap the device you want to unpair that is displayed in the [List of paired devices].
When “Would you like to disconnect from the current Bluetooth device?” is displayed, tap [OK].
- Home
- Various settings for the unit
- Adjusting the volume
Adjusting the volume
Set the volume for the source language voice or operation sound effects.
Tap
Move to the right to increase the volume, or move to the left to decrease it.
You can also adjust the volume with the volume button on the right side of the unit.- Volume up
- Volume down
- Home
- Various settings for the unit
- Changing the display brightness
Changing the display brightness
Tap
Move the slider to adjust the display brightness.
Move to the right to increase the brightness, or move to the left to decrease it.
- Home
- Various settings for the unit
- Changing the size of the text displayed on the unit
Changing the size of the text displayed on the unit
Tap
Select from five types.
- Home
- Various settings for the unit
- Updating the software of the unit
Updating the software of the unit
NOTE
To download software, the battery level must be at least 30% and the unit must be connected to the internet through Wi-Fi.
Tap
The unit will be updated if there is newer software available.
Tap [Update].
To receive notifications about software updates
You can receive notifications when a new software version is released.
For details, refer to “Using the Notification feature”.
- Home
- Various settings for the unit
- Correcting the translation direction
Correcting the translation direction
The translation direction is automatically corrected and translated. Setting this feature [ON] is useful because it will automatically correct even if you forget to change manually.
For information about translation direction, refer to "Changing the translation direction".
Tap
Tap the slide switch to turn it [ON].
If you want to change manually, set it [OFF].
- Home
- Various settings for the unit
- Placing frequently used features on the Home screen
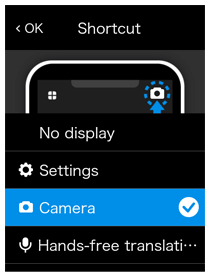
Placing frequently used features on the Home screen
You can place a shortcut for a frequently used feature at the upper right of the Home screen.
Tap
A list of features that can be set as a shortcut is displayed. Tap the name of the feature you want to place.
- Home
- Various settings for the unit
- Using the Lock Screen
Using the Lock Screen
This feature locks the screen after the time set in [Sleep Settings] has elapsed.
Tap
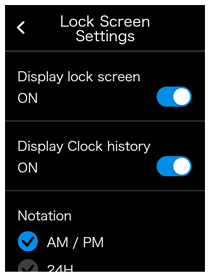
Turning the lock feature on/off
Tap the slide switch to switch between [ON] and [OFF].
Displaying the previously visited location and time
The previously visited location and time can be displayed while the screen is locked.
Tap [Display Clock history] to turn it [ON].
Setting the time notation (12-hour/24-hour)
You can set the notation of the time displayed on the lock screen.
Select the notation from [Notation] according to your preferences.
Displaying the battery level
You can display the battery level while the screen is locked.
Tap the slide switch to switch between [ON] and [OFF].
Displaying the communication status
You can display the status of the mobile and Wi-Fi network while the screen is locked.
Tap the slide switch to switch between [ON] and [OFF].
Setting the PIN code
When unlocking the screen, you can set whether to unlock by entering a PIN code.
Tap the slide switch to switch between [ON] and [OFF].
- Home
- Various settings for the unit
- Using the Notification feature
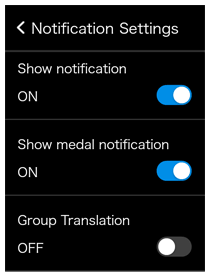
Using the Notification feature
Tap
If you set this feature [ON], you will receive the following notifications.
- When software update is available
- When a medal is earned
- When a message is received from a group translation member
- Home
- Various settings for the unit
- Setting the time until the unit sleeps
Setting the time until the unit sleeps
The display turns off and saves battery power when the unit is not used for the amount of time set.
Tap
You can select from five options.
NOTE
If [Lock screen] is [ON], the lock screen will be displayed when the unit wakes up from sleep.
- Home
- Various settings for the unit
- Setting the display language of the unit
Setting the display language of the unit
Tap
Select from the list of languages that will be displayed on the unit and tap [OK].
Scroll the list upward to check all of the languages.
- Home
- Various settings for the unit
- Setting when using Wi-Fi in China
Setting when using Wi-Fi in China
Tap
If you are using Wi-Fi in China, select [China] and tap [OK].
When you go to other countries, revert to [Global].
A fewer number of supported languages may be displayed while [China] is selected.
- Home
- Various settings for the unit
- Confirming your Communication Plan
Confirming your Communication Plan
Tap
Confirm the contract period of your data transmission plan. If the remaining contract period is less than one year, you will be able to purchase an extension.
- Home
- Various settings for the unit
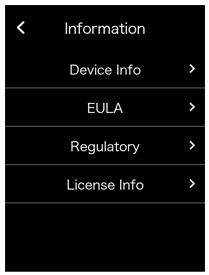
- Checking various information about the unit
Checking various information about the unit
You can check information such as the software version and MAC address of the unit.
Tap
Aside from [Device Info], you can check information such as the [EULA].
- Home
- Various settings for the unit
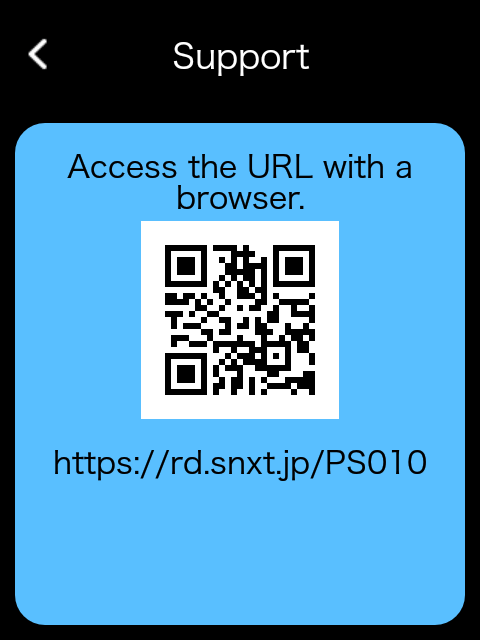
- Referring to the support site
Referring to the support site
You can refer to the latest information and frequently asked questions about the unit.
Tap
A QR code and URL to access the support site are displayed.
Access using a smartphone or computer.
- Home
- Various settings for the unit
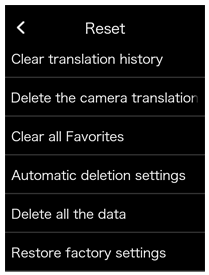
- Using the Reset feature
Using the Reset feature
You can use the unit’s reset feature to do the following.
- Delete all translation history
- Delete all camera translation history
- Delete all Favorites
- Set the translation history auto delete feature
- Delete all data (setting information and various histories)
- Restore the unit to factory default settings
Tap
Tap the displayed items as needed.
NOTE
- The software does not return to a previous version even if the unit is restored to factory default settings.
- All Favorites or translation history will be deleted. To delete individual entries, refer to the following.
- Home
- Inserting a SIM
Inserting a SIM
NOTE
- For global communication models, the SIM is built into the unit and the card slot is empty.
- The unit supports nano SIM cards.
- SIM cards other than those specified by Sourcenext are not supported.
Carefully insert a thinly tipped object to remove the SIM card slot.
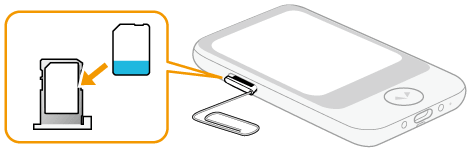
Mount a nano SIM card onto the SIM card slot, and insert it into the unit.
- Home
- Troubleshooting
Troubleshooting
| Issue | Solution |
|---|---|
| The unit is not operating properly. |
|
- Home
- Frequently asked questions
Frequently asked questions
This section summarizes frequently asked questions about the unit in a Q&A format.
| Issue | Solution |
|---|---|
| The unit does not charge. | Wait about 15 minutes while it is charging. If there is absolutely no battery level remaining, it may take some time to start charging. If charging does not start even after about 15 minutes, please contact the support center. |
| The unit does not turn on. | Check the battery level. It may not start because there is no battery level remaining. If it does not turn on even after charging it, please contact the support center. |
| I want to check the supported languages. | Please refer to our website. http://rd.snxt.jp/62495 |
| I want to check what countries support global communication. | Please refer to our website. http://rd.snxt.jp/34280 |
| “No Internet connection” is displayed and translation does not work. |
|
| The unit gets hot sometimes while charging or during use. | The unit may get hot while charging or during long periods of use. This is normal. |
| I want to know the registration procedure for wide extended warranty service. | The procedure depends on whether your registration number is a “serial number (21 digits)” or “PIN (10 digits)”. Refer to the following procedures.
|
| How do I continue using the unit after the contract period with global communication ends (built-in eSIM)? | You can either renew (paid) from the dedicated website, or purchase and insert the dedicated global SIM card. For details: https://rd.snxt.jp/PT910 |
- Home
- Specifications
Specifications
| Unit size (Height × width × thickness) | Approx. 91 × 53 × 11 mm (Pocketalk S) Approx. 123 × 65 × 11 mm (Pocketalk S Plus) | ||
|---|---|---|---|
| Unit weight | Approx. 75 g (Pocketalk S) Approx. 125 g (Pocketalk S Plus) | ||
| OS | Android™ 8.1 | ||
| CPU | ARM Cortex53 Quad-Core 1.3 GHz | ||
| Memory | Embedded (ROM/RAM) | 8 GB/1 GB | |
| Display (touch panel) | 2.8 inches (Pocketalk S) 3.97 inches (Pocketalk S Plus) | ||
| Camera | Main camera | 8 megapixels | |
| Battery | Lithium ion battery | ||
| Battery capacity | 1200 mAh (Pocketalk S) 1550 mAh (Pocketalk S Plus) | ||
| Operating temperature | 0℃ to 40℃ (with no condensation) | ||
| Storage temperature | -20℃ to 45℃ | ||
| External connections | Wi-Fi | IEEE802.11 a/b/g/n | |
| 2.4 GHz | 1 to 11 channels | ||
| 5 GHz | 5.2 GHz, 5.3 GHz, 5.6 GHz | ||
| Bluetooth® | 4.2 | ||
| External devices/others | USB Type-C™ (for charging) | ||
| Communication system/frequency | Supports the 4G LTE (FDD-LTE) frequency band | 1, 2, 3, 5, 7, 8, 18, 19, 20, 26, 28b | |
| Supports the 4G LTE (TD-LTE) frequency band | 38, 39, 40 | ||
| Supports the 3G (W-CDMA) frequency band | 1, 2, 5, 6, 19 | ||
| SIM slot | Embedded | eSIM (not detachable) | |
| External slots | nano-SIM | ||
| Accessories | USB Type-C™ cable | Input voltage: 5V Input current: up to 2A | |
| USB charger | Input: AC 100-240 V 50-60 Hz | ||
| Output: Voltage 5V, Current: 1A | |||
NOTE
Do not insert a SIM for Private LTE (B39) because it cannot be used in Japan.
- Home
- Contact us
Contact us
We accept inquiries about the product at our support page.
https://rd.snxt.jp/56824
For after-sales service, please refer to the support terms of Sourcenext products at the following URL.
https://rd.snxt.jp/56824
Inquiries by email
http://rd.snxt.jp/51991
Inquiries by phone
TEL: 0570-000-762
Operating hours: 10 AM to 6 PM (all year round)
- Home
- Disposal (recycling)
Disposal (recycling)
Box and cushioning material
Package sorting varies by region. Dispose of waste according to the rules of your city. Material identification marks are displayed on the outer packaging.
Product
The product uses a lithium ion battery.
If the product is no longer used, dispose of it and the accessories in accordance with the local ordinances or regulations of your region, rather than disposing it with regular waste.
